Way back when - I'm not sure if this is still true today - when you signed up for a new Yahoo! Store account, before you could do anything in your new store, there was a brief tutorial on how to use the editor. Part of this tutorial showed you how to create sections (category pages), sub-sections (sub-category pages), and items (product pages), thereby introducing to the new store owner or user the idea of a well-planned store hierarchy. This was before breadcrumbs were even a thing, but it laid the foundation for that and much more. Recently, our team-mates and I found ourselves having to explain more and more how store hierarchy works, how it affects breadcrumbs (and multi breadcrumbs), contextual navigations (more on this later) and possibly SEO, so I decided to put all these thoughts together in this brief overview and tutorial.
What is store structure?
Strictly speaking, store structure is determined by how your store's home page, top category pages, sub-category pages, further sub-category pages, and item pages are tied together. Unlike most other e-commerce platforms, Yahoo (Aabaco) stores are highly hierarchical by design. When you are on the store's home page in the editor and click the "Section" button in the editor toolbar, you are creating a top-level category page.
A top-level category page is really just any old category page, except its parent is the home page. The page IDs of pages that you create this way (while on the home page) end up in the "contents" field of the home page (index.html). The IDs appear in the order they were created, the most recently added appearing at end of the "contents" field, although you are free to rearrange them manually as you see fit.
If you go to one of your category pages and click the "Section" button again, you are creating a sub-category or sub-section page. The ID of this page will end up in the "contents" field of the category page you were on when you hit the "Section" button. Whether it is deemed a category or sub-category page is essentially just a logical designation; for the store editor, any page that has any sub-pages (any contents) and has no price is just a section or category page.
If, on any page, you click the "Item" button in the editor toolbar, you will create a product page under the page you are on. A product page is a page that has a price, plain and simple.

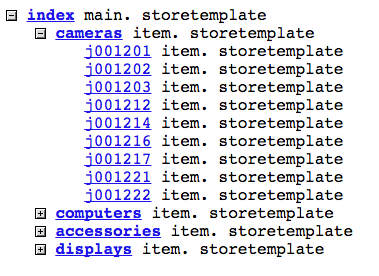
If you create your pages this way, when you click the "Contents" button in your store:

you will be presented with a hierarchical representation - a tree structure - of your store, with your home page (index.html) at the top of the hierarchy, all top category pages indented directly under the home page, all sub-category pages indented under the top category pages, etc., and the "leaves" of this tree structure are usually item or product pages, which don't have further sub-pages.
Categorization strategy
Building out your store structure this way not only has technical advantages, which I will cover in a bit, but it also forces you to really think about the logical hierarchy of your store: having a home page is trivial, but what are the main categories of my offerings? Within each category, what further sub-categories are logical to have?I've talked to merchants before who said they couldn't break up their products into categories, or they could only break the products up into a handful of categories with each of those categories listing hundreds or even thousands of products. While you are the one who knows your products the best, I would say you can always find ways to break products up into multiple categories and sub-categories. If nothing else, you could create a "shop by brand" structure where you break up the products by manufacturer. However, the best possible categorization is based on how your particular client base is looking for your products. You can start with a basic categorization you think makes sense, and over time armed with Google Analytics reports, you can find out how your clientele browse your site and offer them a navigation structure based on that. For instance, one of my clients started out with a "by brand" navigation structure, but over time noticed that their clients were browsing by particular categories, so they changed the store's organization to offer product categories instead.
Another extreme is when a merchant wants to create sub-categories to the smallest detail, having one or two products per final category. That most likely isn't a good organization either. A category that only has one or two products is really not a category at all. As a rule of thumb, if a category has a hundred products or more it could be broken up into multiple sub-categories; although you also want to make sure you don't end up with a store hierarchy that's way too deep, requiring a lot of clicks to drill down to the product level. Here, a "lot of clicks" is a relative term. There are recommendations out there that any product should be reachable from the home page within at most 4 to 7 clicks (or less) but again, no two web sites are the same. As a side note, if your lowest level sub-categories still have dozens or hundreds of products, a filtering solution where people can narrow down the offerings based on dynamically selected attributes might be the way to go.
Three ways to create a hierarchy
1. Manual Method
Creating pages manually using the store editor's "Section" and "Item" buttons is the most obvious way to achieve this task. There are, however, two potential problems with this: one is that it can be relatively slow, especially if you have a large store to fill up, and two, when you use those buttons to create pages, the pages' ID - and therefore their URL - will be pre-determined for you by the store editor based on the name you enter for these pages. For example, creating a page this way and entering a name, "Large Pillow with Floral Design", results in an auto-generated ID of "lapiwiflde", so the URL of this page would be lapiwiflde.html. Since page URLs may affect SEO, an ID like that is less than optimal. So how can you control the ID (and the URL) of a page? Well, there are two ways to do this, but before I get to those, both of these methods require what's called the "Advanced Editor".The Advanced Editor
When you first get into the store editor, unless you change any settings, you are in the "Regular" store editor. The "regular" store editor has a reduced set of editor buttons to minimize the damage you can do to your store. This may sound funny, but you know the saying, "I know enough to be dangerous?" Well, with the "regular" editor you can't be dangerous (or not much.) This is the default, a single row of yellow buttons in the editor. However, there is a red triangle to the right of the last button: if you click that, you are immediately in the "advanced" editor. The only difference between the "regular" and the "advanced" editor is that the "advanced" one exposes a lot more buttons, and once you have access to those, you definitely can be "dangerous" unless you know what you are doing, or unless you are careful. However, this is where we want to be in order to be able to create pages where we can designate the ID (and therefore the URL) of a new page.2. Creating a page with a specific ID
So now that you are in the "advanced" editor, you can create a page with a specific ID (and URL.) To do so, click on the "Contents" button in the advanced toolbar, and then click "New". The next screen will let you specify the ID of the page you are about to create, so type it in (using only letters, numbers and hyphens), and click "Create". Now you'll be on a "new item" form, the same you are used to seeing when you create a new page. Fill out the details and hit Update. There you have it, a page with an ID you specified.There is just one problem: this page, when published, can only be accessed if one knows the URL (or possibly through the ind.html page.) It is what we call a "floater" page, a page without a proper home in the structure of your site. If you click the "Contents" button of the advanced editor, you'll see such floater pages towards the bottom of the page, completely outside of the hierarchy of the site (outside of the tree under the index page.)

There are times when you specifically want to create such a page, but most of the time you want to have all your pages (section and item pages) be part of the hierarchy under the home (index) page. If a page remains a floater, it will typically have no breadcrumbs, it can't have a "contextual navigation" bar, and will not have an "Up" button in the yellow editor toolbar. To place a floater page into the store hierarchy, you have two options.
One option is to use the editor's "cut and paste" functionality. Simply go to the floater page in question, and click the "Cut" button. This will put that page on the clipboard. Now navigate to the section page you want this floater page to be in, and click its name in the "clipboard". This will plant that floater in the category or section page you are on.
The second option is to go to an appropriate category page (or pages) and enter the ID of your floater page in the "contents" field of that category page.
These methods works fine if you only need to create a handful of pages, but what if you have hundreds or thousands of pages to create? Well, in that case you'll need to use the "database upload" method.
3. The Database Upload method
If you are unfamiliar with the "Database Upload" method, you can read up on it here:https://help.smallbusiness.turbify.net/s/article/ka21a000000M3dpAAC/SLN18547
What I would like to highlight here is that in your CSV upload file, you can include two columns that are useful in creating pages with a specific ID and placing the newly created pages into a specific category page.
To specify the ID of newly created pages, all you have to do is include a column called ID and enter the desired ID of the page for all new items. That's really all. The same rules apply for IDs as when you create them manually, namely, only alphanumeric characters or a hyphen. Any other character will be automatically converted to a hyphen when the page is created.
Then, there is a column called "Path". This column specifies where your item will live in the store, and there are two possible formats for this:
- You can enter the Path in this format
Section A:Section B:Section D
In this case the item you are uploading will be placed in a top category called Section A, a sub-category called Section B, and a sub-sub category called Section D. If this page doesn't exist, this hierarchy will be created for you using the category names you provided, with all spaces and special characters converted to hyphens. So in the above example, if none of those category pages existed, after the upload you'll have a top category page whose ID is section-a, then a sub-category under it whose ID is section-a-section-b, and a sub-sub-category with the ID , section-a-section-b-section-d . And the item you are uploading will be placed in that category page. - Alternatively, if you know the IDs of the section pages you are loading the items into, you can simply use the IDs of those section pages in the Path column. No colons, nothing, just the ID of the target section page.
- Finally, if you are just updating existing items (not creating new ones), you can simply leave out the Path column altogether.
Benefits of a clean store structure
Done right, having a logical, hierarchical store structure has far reaching consequences for the way the store website works.No broken links
Anything content-related, when referenced from within the templates (and RTML) ensures that those references will never appear to be broken links on the site. This is an absolute plus compared to embedding hard-coded links in the HTML source, for example, in the caption of a page. If you have a hyperlink hard-coded, for example, Click this link, if you delete the page abcd, the above link will still be in the caption but now it will be a broken link. However, any hyperlink generated in RTML based on the contents field will automatically "disappear" if the referenced page is deleted. A handy example is a navigation bar based on the contents of the home page. Such a navigation bar is typically coded in RTML by going through the IDs in the contents field of the home page and displaying hyperlinks for each. If you were to delete any of those category pages from the home page, the navigation bar would then instantly reflect this change without leaving the broken hyperlink in place."True" parent
Since you can copy and paste any page into more than one page, any one page can potentially have multiple "parent" pages. When you are looking at any page in the store editor, the "Up" button takes you to its parent. But if a page has multiple parents, which parent does the "Up" button take you? In other words, among the potentially many parents, which is the true parent page? It turns out that the editor will consider the page to be the true parent into which the child page was most recently entered. This might be a bit convoluted at first, but what this means is that if you take a page A, and you copy it into page B, C and then D, then the last one, page D will be its true parent. Similarly, if you did a database upload that included this page A three times, the last "path" it was loaded into would be its "true" parent. The "true" parent will have implications in the next two examples I'll discuss.Breadcrumbs
You all know breadcrumbs I assume, those are those little links at the top of the page, typically below the header, that shows you where you are in the site relative to the home page. Breadcrumbs are part of pretty much every store. How do breadcrumbs work? In Yahoo/Aabaco Stores, the template traces its way back from the current page using all the parents all the way up to the home page. This has two ramifications:- Floater pages (those that either have no parent or whose parents trace back to another floater) will NOT have any breadcrumbs.
- Pages that have multiple parents will show the breadcrumbs that goes through the "true" parent of each page.
- If the page in question is a floater then try moving it into the hierarchy under the home page. You can easily find out if a page is a floater if you go to it in the editor, and keep clicking the "Up" button in editor toolbar until there is no more "Up" button. If, at that point, you are not on the home page, then the page you started from is a floater or orphan page.
- If the page is not an orphan, copy and paste it into the category page (using the editor toolbar's "Copy" button) you want to be its true parent.
- You can have multi-breadcrumbs installed in your store, which shows not one but all the possible breadcrumbs trails for each page. This of course involves coding in RTML, and it may increase the publish time of your store, depending on the overall number of pages in the store, and how much "cross-linked" your structure is (that is, how often you copied and pasted various sections and pages into other sections.)
- Or, you can have a "smart breadcrumbs" solution installed in your store, such as the one we offer here: www.ytimes.com/breadcrumbs.html
Contextual Navigation
Contextual Navigation is a navigation structure, typically at the top or on the left rail, that changes depending on which main category of the site you are in. For instance, if your store has main categories for Green Widgets and Red Widgets, if you go anywhere under the Green Widgets section you'll see the navigation bar for the Green Widgets on all of those pages, whereas if you go anywhere under Red Widgets, then you'll see that navigation bar anywhere there. Contextual Navigation also requires RTML coding, and it works based on breadcrumbs by figuring out what the top level category page is for the page you are looking at. As such, it also uses the hierarchy of the site - that is, the parent / child relationships dictated by the contents fields of the home page and the pages under it.Contextual navigation works best if your store is strictly hierarchical, meaning your store structure is set up in a way that the home page is at the top of the hierarchy, your main category pages are directly under it, then sub-category pages, etc., until you get to the item pages - and, you have no pages copied and pasted into multiple other category pages.